How To Create A Website With Dreamweaver? Adobe Dreamweaver is the industry standard for web developers and web designers. I used the latest version of Adobe Dreamweaver to design and develop websites. It is my favorite website editor. In fact, when the latest version comes out, I usually up-grade straight away.

There are so many great things I can say about Adobe Dreamweaver; however, it would take too long. As someone who has used several different website editors, I simply find that Adobe Dreamweaver is the easiest to use.
Like everything it takes a little while to become familiar with Adobe Dreamweaver. After all, it is packed with many great features. However, if you want to create websites for passive income, then Adobe Dreamweaver is certainly a good place to start.
How To Create A Website With Dreamweaver
To create a basic website, you really need a home page, terms and conditions page, a sitemap html page, a sitemap xml page and a RSS xml page. In the terms and conditions page, I include a disclaimer, disclosure and privacy policy. These five pages are the basis of your website. When you add web pages to your website, you need to simply build out from your home page. That is, your home page become the template page for your website.
To create a website with Dreamweaver, I usually use a web page template. You can download a free template by clicking free website template as an example. I am going to use this free website template to show you how easy it is to create website with Adobe Dreamweaver. As I said before, a basic website requires about five web pages. I will use the free web page template that uses a css file. The css file is in the support-files folder and all images are in the images folder.

1. Open Adobe Dreamweaver
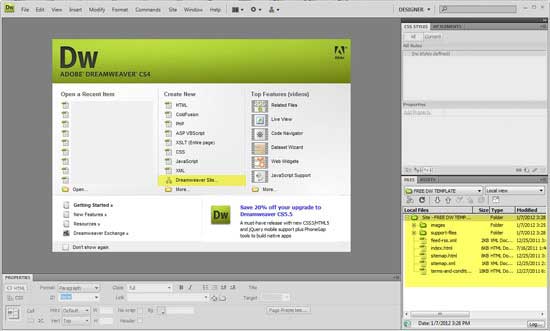
Once you open Adobe Dreamweaver, click on Dreamweaver Site. A Site Definition caption will pop-up requiring you to fill in the name of your site. If you use the FREE DW TEMPLATE, then type in FREE DW TEMPLATE and click next.
When the next caption appears, “no” will be automatically highlighted so just click next. The next caption will require you to establish where you are going to store your website files. Fill in and click next.
The next caption will ask: “how do you connect to your remote server?” Open and click “none”. Click next and another caption will pop-up and confirm these details. Click done and you are ready to begin adding and editing the free template. The files for the free web page template will appear at the bottom right of Adobe Dreamweaver’s interface. See below image!

2. Edit Web Page and Add Content
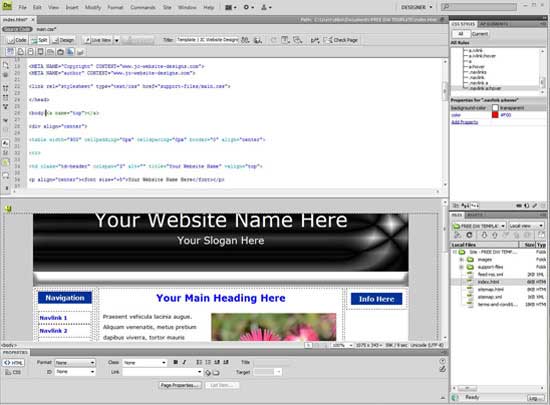
In the local files panel (bottom right), double click on the index page. The index page will appear in the work area of Adobe Dreamweaver’s interface. Use the split interface so that you can see the html code (top) and how it will look (bottom). You can preview your work by clicking on preview. Preview is available from your menu bar. This is at the top of the interface.
Now that you have your index page open, you need to start with editing the web page. Start by putting in your title, your keywords and your description.
Once you have finished this, type in your website name and website slogan. Your website name and website slogan will appear in the header of this webpage. The best way to learn Adobe Dreamweaver is to experiment. Try things and see how they work.
As you begin to edit the web page and add content, you simply need to work your way down the web page template.

When you finish editing and adding, you will need to work your other website pages. Start with terms and conditions and then sitemap and rss pages.
If you are new to Adobe Dreamweaver, a webpage template is a good place to start. As I said before, experiment and find out what works and what doesn’t.
3. Publish Website
Once you finish your website, you will need to upload it to your server. I use FileZilla to publish my websites. FileZilla is a free website publisher.
FileZilla is also very easy to use. With FileZilla you will have your website up and running in no time at all.
4. Some Comments
It takes time to learn Adobe Dreamweaver but once you have become familiar with it, you will find that it is a great software program for creating attractive and professional websites.
I use the spilt interface so that I can see both the html code and the actual design of the webpage. For further viewing I also use the preview browsers. The preview shows the actual website as if it were alive. Furthermore, you can preview the website in different browser. I usually preview the website in google chrome, internet explorer and firefox. This makes sure that the website looks the same in these three major browsers – how to create a website with Dreamweaver!
